Let’s get propagating! One of the best parts about growing Monstera Deliciosa is propagating them, using part of a parent plant to create a whole new baby plant! It can feel scary to cut your Monstera, but the reward is worth it. Today, we’ll cover taking a cutting from your own parent plant, and how to get it started growing roots and new leaves. For advice about buying a cutting to propagate, look out for our variegated Monstera purchasing guide, coming soon.
Want to use what we use for our Monstera plants? Check out our Monstera care product recommendations that you can purchase from Amazon.
Want your node or cutting to grow roots or leaves faster? Skip ahead to learn how:
Don’t have roots? Learn about rooting hormone. Read this.
Want existing roots to grow faster? Learn about water fertilizer. Read this.
Have roots and waiting for a new leaf? Learn about cloning paste. Read this.
Table of Contents
Where to cut your Monstera for propagating
The number one rule for propagating Monsteras is that you always need a node! You cannot propagate a Monstera without a node. Understanding the parts of a Monstera Deliciosa plant will help you achieve success when propagating.
Monstera Deliciosa anatomy for propagating
To begin with, nodes are the ridges around the stem of the Monstera. Each petiole (the long green stalk that holds the leaf) grows out of a node. As a general rule, there will be one node for every leaf, but there can be a few extra if the plant aborted or lost a leaf, or a new stem grew from a previous cut.

Nodes are the location in the plant where new branches can start. Right above each node is an axillary bud, the dormant shoot of a new stem, waiting to be awakened by a cut. The axillary bud can be visible as a round pointed bump the same color as the stem, or it can be inside the stem. Sometimes the bud is hidden by the empty sheaf left behind by a leaf.
The internode is the portion of the main stem between nodes. In order to get a node in your cutting, you need to cut the plant on the main stem on the internode, not on the petiole or leaf. If you cut just a leaf, it will not contain a node.
You also might see some aerial roots growing from your Monstera’s stem. Aerial roots start out as a white nub breaking through the stem, and grow into a long brown flexible root. Sometimes, they develop a papery or bark-like covering.
Monsteras use aerial roots to cling onto trees and climb in the wild. If they contact the soil, they can start to grow into normal roots; however, by themselves they are not the same as soil roots and cannot sustain a plant.
Other Monstera varieties, like Monstera Adansonii, have very similar anatomies to Monstera Deliciosa. Knowledge of one can be used to propagate the other in the same way!
We put together a propagation guide for all plants! Check out plant propagation supplies for any indoor plant!
Stages of Propagation
Unrooted cutting
A freshly cut piece of a Monstera is called a cutting. When you first start propagating, your cutting will not have any soil roots, although it may have aerial roots. A cutting with aerial roots is not “rooted,” because aerial roots cannot sustain the plant.
Important note: While your Monstera cutting remains unrooted, it is slowly dying, the same way cut flowers die in a vase. Until it grows roots, the plant is missing a vital piece of the photosynthesis equation: water. Without an external source of water, your plant cannot feed itself for long, and will eventually turn yellow. Scary, right?
In order for your Monstera Deliciosa to survive propagation, you need to focus on growing roots. Roots are priority #1!
Rooted cutting
Once it grows a full set of roots, the cutting is considered rooted. The first one that grows will be a single white, fuzzy root, coming out of the stem or an existing aerial root. The fuzzy root hairs absorb moisture for your plant. Once this root grows long enough, it will start to produce little feeder roots coming out the sides.
Established cutting
When the main roots and feeder roots grow to several inches long, the cutting is ready to be planted in the final medium! The cutting becomes established once the roots have adjusted to their new home and started to grow again.
Note that the transfer from propagating medium to soil can cause some roots to die! I have heard some people use a rule of thumb like, “expect 1/3 of the roots to die in transition.”
The exact number depends on how much you disturb the roots while planting, and how similar you keep the moisture level. Make sure before planting that your cutting has enough roots to sustain itself even if it loses a few.
New plant
Finally, your Monstera starts producing new leaves! This can happen before the cutting is established in it’s final medium if you keep it rooting for a long time. If your cutting starts to produce new growth, it is getting enough water to be a happy, thriving plant again!
When to propagate your Monstera
You can propagate your Monstera at any time! As long as the plant is actively growing, it is safe to propagate. In winter, you may need supplemental lighting for your plants to continue growing. In the worst case, it will take your cutting longer to grow in the winter. See our full Monstera light conditions guide for more information.
Choose what type of Monstera cutting to make
Next, you need to decide what kind of cutting to take.

- Top Cutting – A top cutting is the most basic, and requires just one snip. By separating the top of the stem from the bottom, cutting on the internode, you remove the plant’s terminal bud, the growth point at the top of the stem. You can see this growth point as a pointy bump forming on the petiole of the newest leaf. Top cuttings are the best type of cutting because they start growing again the fastest and the new leaves will not lose much maturity.
- Mid Cutting – Once you remove the top cutting, you can separate additional cuttings from the middle of the stem. Each middle cut requires two snips, one above and one below. A mid cutting will start growing a new stem from its node’s axillary bud, so it will be starting over in terms of leaf size and maturity.
- Stem cutting – Also called a node, “wet stick”, or “chonk,” a stem cutting contains just nodes and no leaves. Propagating a Monstera Deliciosa without a leaf is possible, it just takes longer with no leaves to perform photosynthesis.
What size Monstera Deliciosa cutting is best for propagating?
My ideal cutting would have 2-3 leaves, which also means 2-3 nodes. Here are the reasons why:
- A cutting with more leaves can produce more energy once it is rooted and regains access to water. This speeds up the process of growing the first new leaf, or activating the axillary bud, if applicable.
- You have more margin for error. If you experience rot and lose a node, you still have a chance for your cutting to grow.
- Your cutting will look like a full plant sooner. One leaf cuttings can look really awkward in a pot until they grow new leaves.
- A larger cutting is more likely to contain an aerial root. For a top cutting, the newest node is typically immature and may not have an aerial root yet. Including a few lower nodes that already have aerial roots will help your cutting root faster.
If you want to split your cutting into single nodes to maximize the number of plants, for example with a variegated Monstera, I recommend waiting until all the nodes have their own roots. You can then split them later with less risk.
Why 3 leaves and not more?
You may remember me mentioning in the post about getting your Monstera to grow splits in its leaves that all green healthy leaves help the plant grow. In that case, why wouldn’t you want a cutting with the maximum number of leaves possible?
The difference is that for an unrooted cutting, you need to balance energy production and consumption. Without water from the roots, a cutting with many leaves may use more energy to sustain them than it can produce. In that case, the leaves will turn yellow and die off one by one until a balance is reached. This is especially true for mature cuttings with very large leaves. I learned this lesson the hard way with a gigantic mature cutting.
Do you need an aerial root?
Aerial roots are not necessary for a cutting to produce roots but they are beneficial. They will make the unrooted phase much shorter, reducing risk to your plant.
If your cutting has aerial roots, even if they are an awkward shape, do not cut them off. Only cut off aerial roots that are broken, mushy, or black. If the aerial root is a thin pale string with the outer casing falling off, it has rotted and should be cut off as well.
If you have a cutting without aerial roots, the new root will emerge from the stem. While propagating, look for a white, crystal-like bump. This indicates that roots are on their way.
Propagating Monstera Deliciosa leaves
Can you propagate a Monstera leaf? Without a node and axillary bud, you can root a Monstera leaf but never produce a new plant. Leaves can last a long time if kept in water, so you can use them as a decoration if you wish.
How long does propagating a Monstera Deliciosa take?
The time it takes to propagate a Monstera depends on the health of the cutting and propagation method. Typically, it takes a few months.
Here are some anecdotal examples of times to unfurling of first new leaf:
- Top cutting with aerial root: 1.5 months
- Mid cutting with aerial root: 3 months
- Node cutting with aerial root: 4 months
To learn more about planting your Monstera cutting, check out our guide.
What propagation method to use with your Monstera cutting
There are a ton of ways to successful propagate your Monstera Deliciosa into a new plant! All of the methods can work, but each have pros and cons.
When choosing a method of propagating your Monstera Deliciosa, consider the things your cutting needs to grow roots and avoid rot:
Moisture keeps your plant alive without roots and encourages root growth. Keep aerial roots consistently wet. High humidity around the plant will limit water loss. Airflow is important in a high humidity environment to maintain oxygen around roots and prevent root rot.
To avoid stem rot, keep the cut ends of the stem as dry as possible. The best way to do this is by suspending them out of the propagating medium.
Many people overcompensate to avoid rot and let their roots get too dry while propagating. Dry plant = dead, dehydrated tissue = more rot.
Until your cutting grows roots, you don’t need to add nutrients to the water you use to moisten your propagation medium, because it can’t absorb them. Once roots begin to grow, you can add nutrients to help it grow faster. I use a few drops of Liqui-Dirt added to the water.
You can read our full guide on fertilizers here.
Air Layering
Air layering means growing out the aerial roots of your plant into soil roots before cutting it. It can be done with bundles of moss wrapped around the aerial roots, guiding aerial roots into moss on a pole, or placing aerial roots into an additional container of soil or water.
Air layering is the best method of propagating because it allows your cutting to grow roots while still attached to the parent plant. This removes the unrooted phase of propagation, giving your cutting the best possible chance to succeed.
I use this method as often as possible.
Pros: Very low chance of rot. Roots grow faster because the cutting can use energy from the entire plant. Very low chance of leaf or node loss on cuttings.
Cons: Does not work for top cuttings that don’t have aerial roots yet. Does not work for existing rootless cuttings or rehabilitating an entire rootless plant. Makes your mother plant look silly while in progress.
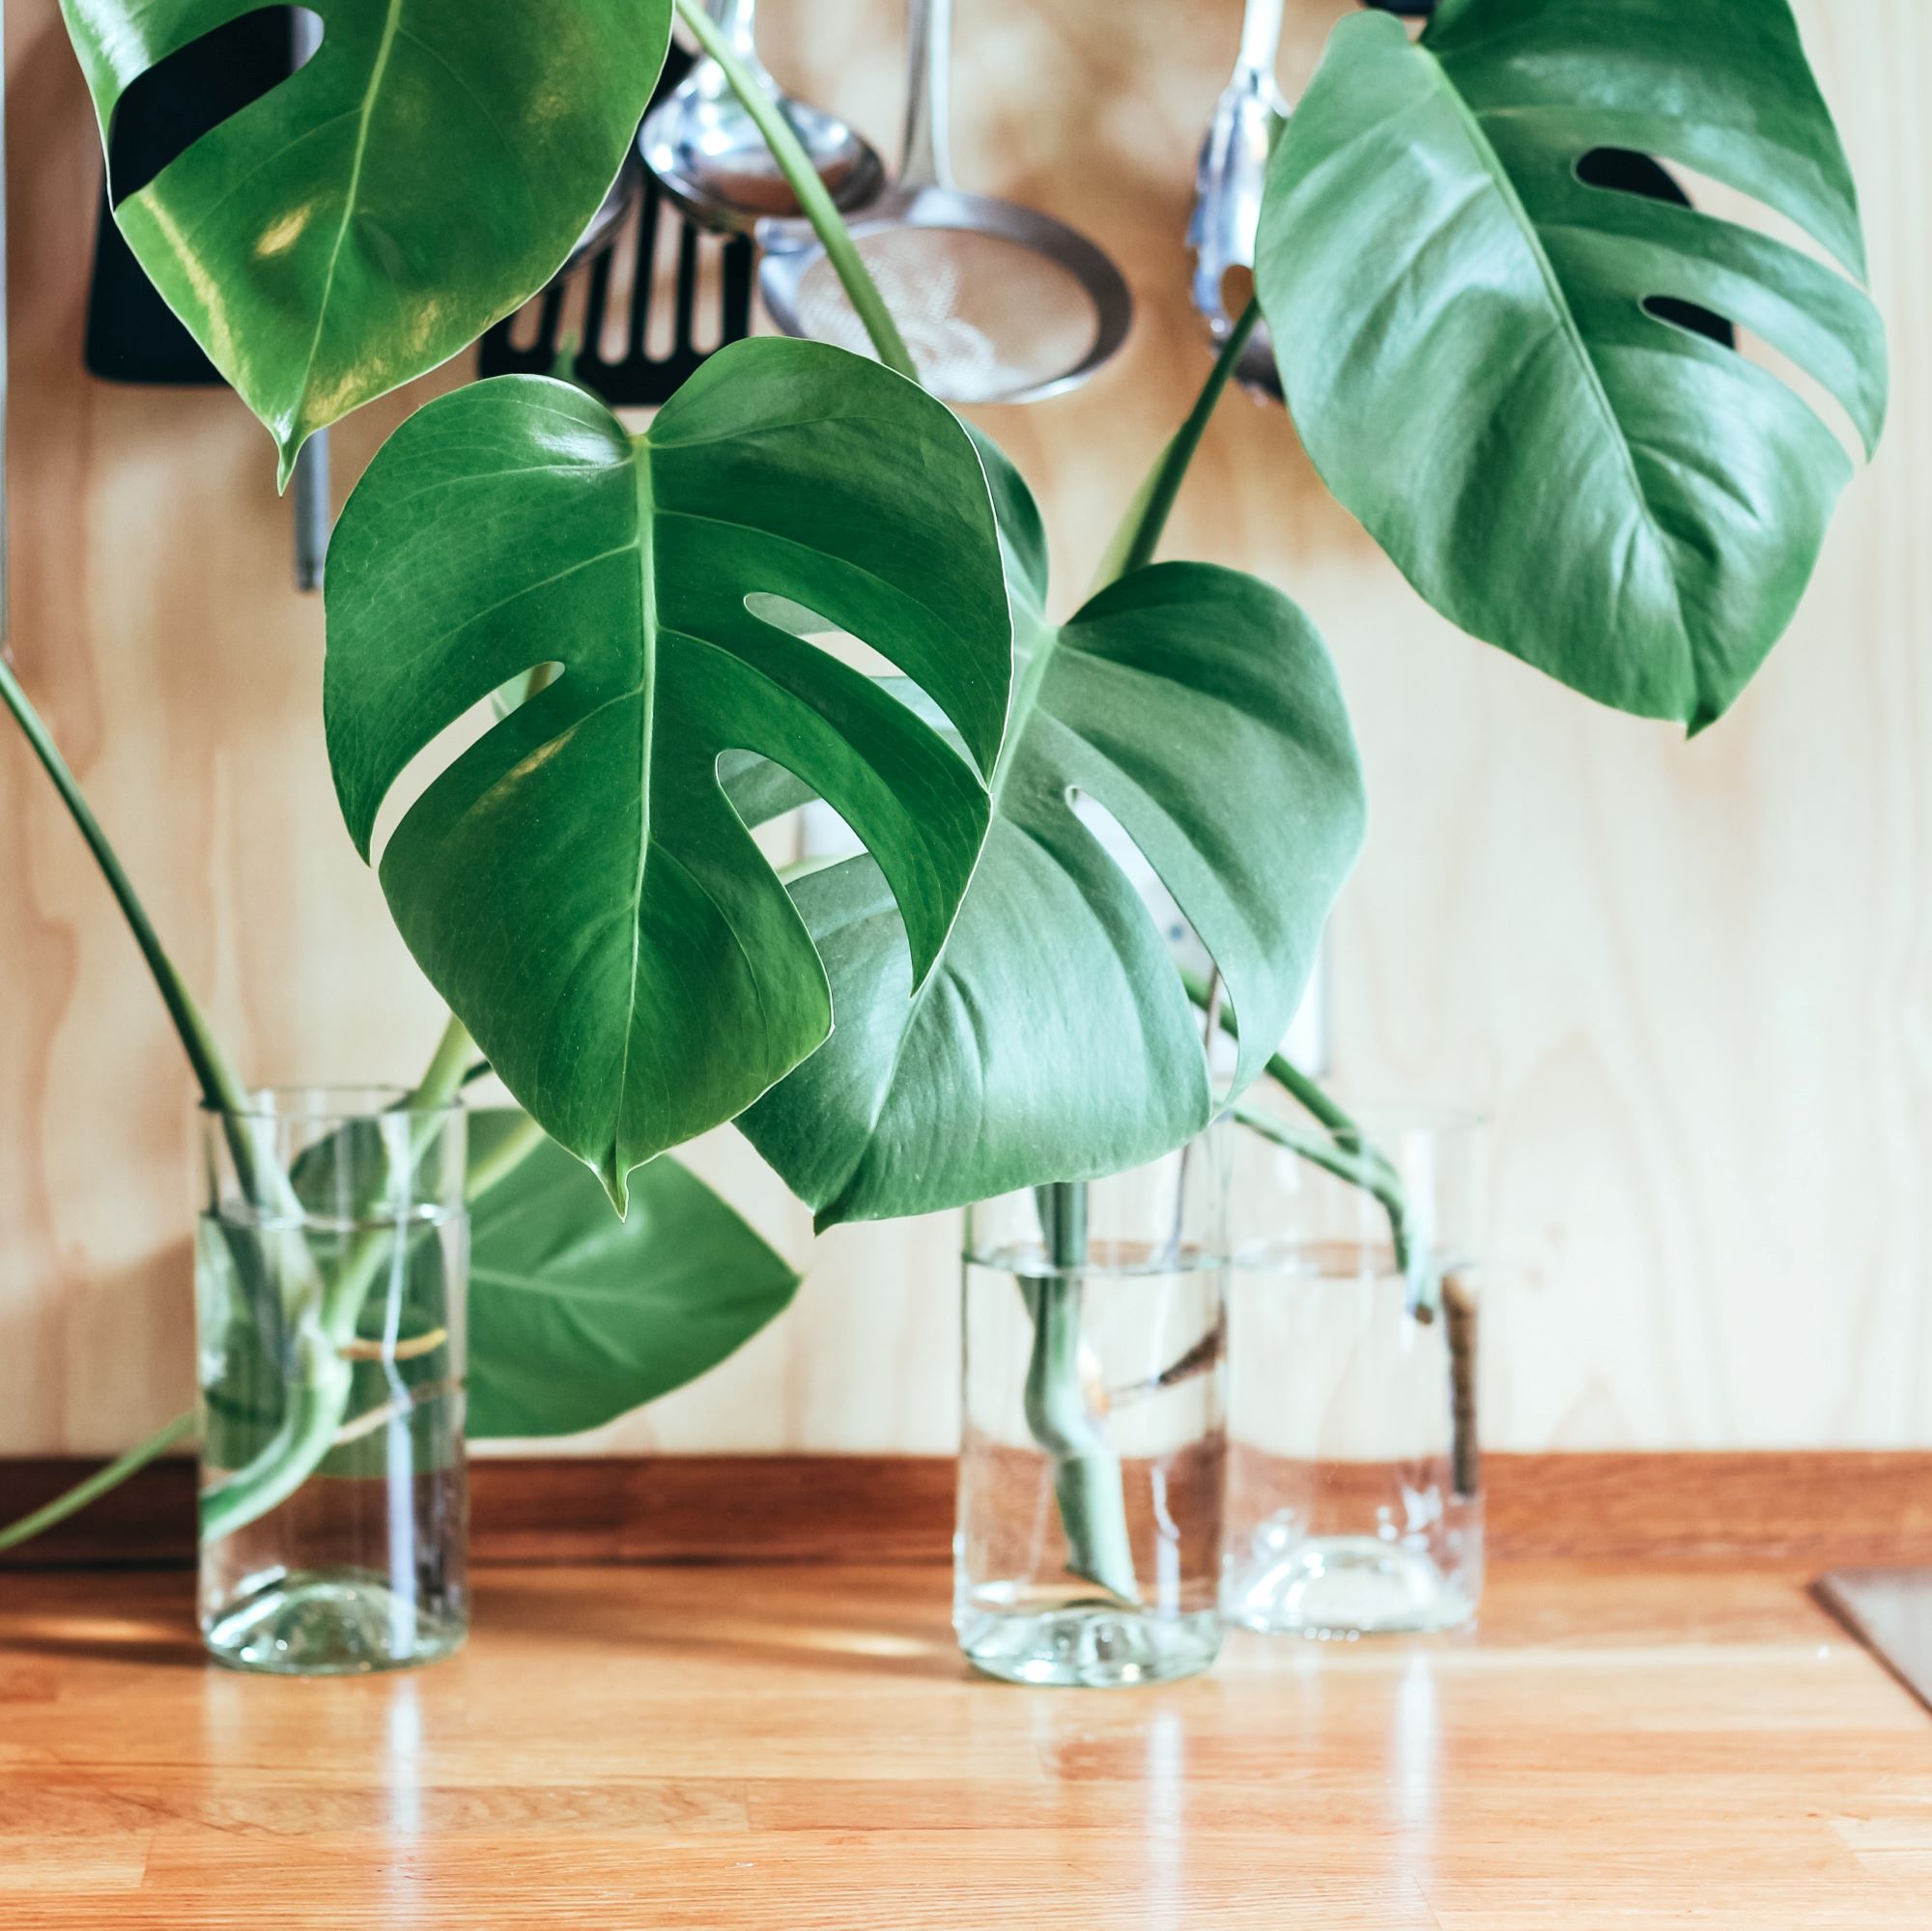
Propagating in Water
Water is the simplest way of propagating your Monstera Deliciosa! Fill a glass or jar with water, place the cutting in, and replace the water every few days. To reduce the chance of stem rot, try to keep only the aerial roots in the water and suspend the stem out of the water. A fish tank air stone can be added to increase water oxygen levels.
I use this method for healthy, low risk cuttings. Learn more about fertilizing during water propagation.
Pros: Can use a clear container to see roots form and check cutting for rot. Keeps your cutting from becoming dehydrated. Very easy to maintain consistent moisture around roots. No organic matter in medium to introduce disease. No damage to roots when removing from water. Roots grow quickly.
Cons: No airflow around roots. Only source of oxygen is what is dissolved in water. More difficult to transition roots grown in water to soil. Hard to keep stem out of water.
We use this hanging propagation station to decorate our home and clear up counter space near our bright kitchen window. Keep in mind that the tube size is best suited for small Monstera Deliciosa cuttings or any Monstera Adansonii cuttings. Click on the link to see the current Amazon price.
OrganicSun Wall Hanging Plant Propagation Station Macrame Wooden Wall Planter Propagation Stations Test Tube Vase Plant Terrarium for Plant Cuttings Hydroponic Test Tube Flower Holder, Boho Home DécorPropagating in Soil
Many commercial nurseries that need to produce new plants efficiently just plant their cuttings straight into soil. This method can work, especially with a fresh, healthy cutting, but it has the most downsides out of all the methods. See our soil mix guide for our recipe.
I use this method for air layering with plants that are growing horizontally instead of climbing.
Pros: No transplanting required. Plant can benefit from nutrients in soil.
Cons: Hard to maintain consistent moisture. Can’t check on roots forming or see rot. Soil can become anaerobic if overwatered. Organic medium can introduce fungus or disease.
Propagating in Moss
You can also propagate in sphagnum moss in place of soil. Moist moss holds a lot of water, which is great for maintaining humidity around roots while still allowing airflow. A cover, like cling wrap, can be used to hold humidity in the container.
This method can yield great results, but is difficult to execute correctly. People often have issues caused by moss that is too wet or too dry.
I use this method for air layering.
Pros: Maintains high moisture and humidity without liquid water. Lightweight and easy to shape around roots. Easier to keep stem out of medium. Roots transition more easily to soil.
Cons: Can easily become too compacted. Hard to maintain consistent moisture. Can’t check on roots forming or see rot. Damaging and time consuming to remove from roots. Organic medium can introduce fungus or disease.
Propagating in Perlite
Perlite has very similar benefits to water, with the addition of greater airflow. Perlite is absorbent and porous, so it will wick moisture up to areas of the container that are not underwater. Keep the container filled with a small reservoir of water below the level of the stem, and cover the top to hold in humidify around the roots.
You can use any chunky, inorganic material for this method, like pumice or LECA, if you don’t have perlite. Perlite is my preference because it is so lightweight; it is easy to pull out the cutting to check on it without disturbing it too much. Heavier mediums will help the cutting stand up better, however.
Make sure you pick a course perlite (#3 or bigger to minimize dust) without fertilizer. I recommend this perlite:
I use this method for high risk, dehydrated cuttings.
Pros: Easy to maintain consistent moisture around roots. No organic matter in medium to introduce fungus or disease. Minimal damage to roots when removing from perlite. Allows airflow to roots.
Cons: Can’t check on roots forming or see rot.
In the future, we will be creating a detailed how-to guide for every single one of these methods, so stay tuned!
Making the cut
Now it’s time to “chop and prop”!
First, find the location where you will cut. Make sure to leave as much room as possible on either side of the node. This provides space to spare if you experience rot. Identify the location of the axillary bud, above the node, and make sure it is included in the cutting.
When taking a cutting from your Monstera, use a pair of clean, sharp shears. Cut the stem cleanly, without causing any crushing damage, to keep the tissue healthy. I recommend these shears:
Ultra Snip 6.7 Inch Pruning Shear with Stainless Steel Blades
Once your cut is made, the number one priority is growing roots ASAP.
Treating the cut
Once you chop your cutting, you may notice the exposed tissue turning a reddish brown color within a few minutes. Don’t worry; this is just it reacting to air, the same way your blood turns red outside your body.
Now is the time to add rooting hormone to the cutting, if you wish. Monsteras naturally produce this hormone, which signals to the plant that it should grow roots, but by adding it you can encourage it to grow roots faster. Some rooting hormones also contain fungicide to prevent fungus or rot.
Rooting hormone comes in powder and gel format. I use Clonex gel because it works in both wet and dry mediums. Powder is best for dry mediums (like soil and not water) because it will wash off in a liquid.
HydroDynamics Clonex Rooting Gel, 100 ml
Put a small amount of hormone into a separate dipping container, to avoid contaminating the original container with any plant material. Dip the cut end of the cutting into the hormone. If there is any extra in the dipping container, I mix it into the water that I add to the propagating medium.
As it is exposed to air, the end of the cutting will naturally callous, creating a barrier to protect the plant from rot and infection.
Will my Monstera leaves grow back?
If you ever cut your Monstera Deliciosa for propagation, have a broken stem, or just break off the new growth point on a developing leaf, don’t worry! A new growth point will activate and create a new stem.
Monsteras have a trait called apical dominance, which just means that one stem has one growth point active at a time. If your Monstera is growing multiple new leaves at the same time, it likely has multiple plants together in the same pot.
When the dominant growth point is broken or removed, the Monstera will naturally activate a dormant axillary bud. A new growth point will break through the side of the stem and eventually make a new leaf.
Activating the axillary bud
If your Monstera parent plant or mid cutting has not started growing a new bud, you can try to help it along. It’s important not to do this until the plant has roots, if it is a cutting!
Keiki paste or cloning paste, developed for use with orchids, contains a hormone called Cytokinin that encourages bud development. This is a different hormone than rooting hormone, and it will not help with rooting! Place a small amount on the axillary bud to help activate it.
I was skeptical of this product when I first tried it. On first use, it encouraged a stubborn node that had done nothing for months to sprout within a week. Anecdotally, this product has worked very well for me.
Sometimes a cutting will grow a new leaf before forming roots. This is not ideal, but there’s not much you can do about it once it happens. For a node cutting, the baby leaf will help it photosynthesize better.
Propagating Monstera Deliciosa from seed
Monstera Deliciosa can also be grown from seed! Monstera seeds come from the fruit of mature Monstera plants.
You can buy Monstera seeds online if you want to try this method. Typically, you don’t need to go to the extra effort since Monstera are so easy to propagate via cuttings.
Monstera Deliciosa SeedsVariegated Monstera cannot be grown from seeds. The mutation that causes variegation cannot be transferred from the parent via fruit. The seeds of a variegated Monstera plant will produce green offspring unless one happens to spontaneously mutate, but the odds are almost zero. This is the main reason variegated Monstera are rare; they can only be produced by using a cutting of the parent plant.
Want to use what we use for our Monstera plants? Check out our Monstera care product recommendations that you can purchase from Amazon.
We have also put together a general propagation guide for all plants! Check out plant propagation supplies for any indoor plant!